
Hi guys!
I am so excited to write this post since this is my very first time hosting a collaboration. I know I did some loop in the system but it's no big deal and I will try to do better next time! :D
So I hope one of us can give you some inspirations! And I am so sorry for posting this a bit late, since I got a super crazy hectic week. ;'D I hope you understand! Hahaha. :D
And anyway, please don't hope much and bare with me because this is my very first time practicing this kind of face painting, so...yeah. ^^; I promise I'll do better next time. :)
In this post I will try to explain how I made it with a simple tutorial and of course the lists of products I used. Not to forget, giving shoutout to these other amazing ladies! :)
Below are my friends' creation too with their Instagram username. :)


I'm no good at making names for my looks, like I always said. So I let my readers or friends on Instagram decided. Thanks to Regina Bon Bon and Clement on Instagram, I picked the name inspired by their suggestions. :D
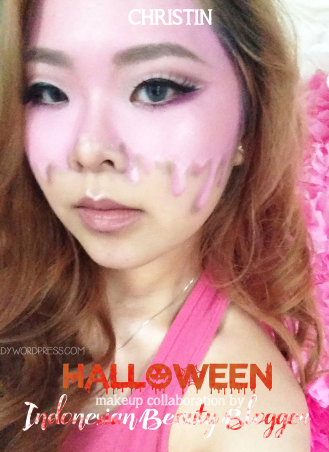
So let me show you the brief tutorial for you!
I actually wanted to make the video tutorial but since this was just for practicing, I didn't planned to post this. ^^; I'm sorry. ^^
The steps below are steps and products I used it my way. You can always be creative and use similiar products I used. ^^

Preparation:
a) Cleanse your face and moisturize well to make sure anything you're going to apply will go on smoothly.
b) Put on your base makeup as usual, but not too thick. You won't be needing the perfect flawless skin underneath, because you're going to apply many things on top of it. I just put on foundation without concealer. I used 88 Liquid Foundation #21.
1. Use whitest powder you have to make a thin white cast complexion. Using NYX Jumbo Eye Pencil #Milk to make lines on areas which I used to highlight. Then blend them out.
2. Using black gel eyeliner (Tony Moly Backstage Gel Eyeliner #Black) to make outlines. You can also use black eyeshadow and brush to make a super thin black outlines in case if you are not sure yet about the shape. I mostly use it that way to draw thin outline for lines which are need to be symmetrical. For example, the cheekbones lines.
3. Fill in the outlines that need certain and solid colours. For example to fill in the black eye area parts, the nose parts.
4. Using The Saem Perfect Tip Cover Concealer #01 Clear Beige, I conceal my lips. Again, I used a bit of NYX Jumbo Eye Pencil #Milk to give the white cast. Draw rough lines on the lips. I also color the inner part of my lips using the same gel eyeliner. Just don't lick it! xD I did't use lip balm to prevent swallowing the water color or the eyeliner. The length of lines of the 'teeth' that you draw on the lips are different. From the centre to the side, it is longest to the shortest. Just draw the centre lines across your natural lip lines. Don't forget the small details. Using the right brush will help you easier make neat details. Connect the 'cheekbones' to the mouth part as you can see above.
5. Play the color as you like! I used Mehron Waterworks Face Paint. I used white, red, green, blue, yellow. I also use those color of eyeshadows to make the color more vibrant. I used Coastal Scents 88 Original Palette. Remember to blend, shade, blend, shade!
6. Stroke and make shades to make it more natural and real. I used black eyeshadow to make the shades. Like on my temple, under lips, the frowning look and other small details. For the blood detail on my cheek, I used Tony Moly Party Lover Tint #2 Apple. I also sparkle silver subtle glitters all over my face. I used Etude House Tear Drop Powder #1 Silver Tear. I also put pigmented black eyeshadow on top of my eyeliner with The Balm Nude Tude Palette. Also, I used Shu Uemura Eyeliner in Green to accentuate some green lines that I think need to be bolder.
Then to make your picture shows the color better, you can use a ring light! I got mine from Flameparadise.

I think this might be better with just black and white. (?) xD


Don't forget to check out others' creation too! Just click their names below their pictures and you will be linked to their posts. :)


I hope this tutorial is useful and you can comment about what do you think! I'd really love to receive feedbacks since I am a beginner. ^_^
What collaboration do you think I should do next? Let me know on the comment section. :)

 :)
:)
 :(
:(
 :))
:))
 :((
:((
 =))
=))
 =D>
=D>
 :D
:D
 :P
:P
 :-O
:-O
 :-?
:-?
 :-SS
:-SS
 :-f
:-f
 d(
d(
 :-*
:-*
 b-(
b-(
 h-(
h-(
 g-)
g-)
 5-p
5-p
 y-)
y-)
 c-)
c-)
 s-)
s-)
 d-)
d-)
 w-)
w-)
 :-h
:-h
 :X
:X

Aaahh ternyata pake Mehron.. Punya brand lokal susah banget setnya. Pengen nyobaaa :3
ReplyDeletegadzotica.com
Iya :D
DeleteProduk lokal pake apa kak? Ini aslinya juga ga terlalu pigmented kalo gak aku tambahin eyeshadow -.-
Viva jes. Tapi susah banget diratainnya. Niat hati ngeratain malah kehapus kalo kena tools.
DeleteOalah iya ya tambahin eyeshadow biar warnanya keluar n set :D
Mehron nya cakep bgt warnanya jesss <3
ReplyDeleteNice result :D
Seperti balasan komeku ke kak Gadis diatas ce, ga sepigmented itu sbnrnya. Cuma aku mainin pake eyeshadow >< Thank you ce ! ^^
DeleteHai, Jess..
ReplyDeleteKamu pakai Mehron yang seri apa?
Beneran nggak pigmented ya? Padahal aku pengen beliii.. Huhuhu..
Lagi cari face painting yang water based :|
www.monicaagustami.com
Bukan nggak pigmented sih tapi kurang kalo aku bilang. Dan iya, itu waterbased. Emang biasanya kk pake yang gimana? ._. Aku lupa namanya tapi nanti aku coba review yah :D
DeleteAk pikir slama ini kk udah pake yang mirip2 yang aku pake gitu (?)
Thank you for visiting! :)
jesssss, blending colorsnya bagus bangettttt !!!!
ReplyDeletewww.mariaistella.blogspot.com
makasih stel! ^^ <3
Deletemehronnya cakep banget warnanya ce uhhh. cece yang paling totalitas lupp lup
ReplyDelete